How To Use A Nuwave Pro and Pro Plus Infrared Oven?
Are you tired of using a bulky oven that takes forever to heat up and uses a lot of energy? Well, have you heard of the Nuwave infrared oven?
I recently came across this handy kitchen appliance and was curious to find out more. So I did some research and found out that it’s portable, compact, and uses less energy than a regular oven.
I was so impressed that I had to learn all about it and find out if it’s worth the investment. And let me tell you, it is! So let me share with you what I’ve learned about using a Nuwave infrared oven from start to finish.
This article (written in 21016) talks about using older Nuwave Pro and Nuwave Pro Plus infrared ovens. If you have a newer Nuwave Bravo or Nuwave Primo oven, the steps may be different.
How to Use Nuwave Oven – Step-by-Step Guide
1. Make sure all components of the oven are clean
Before you start using your new Nuwave oven which, in my opinion, is the best infrared oven, the first thing you should do is to ensure that each oven component is clean.
Hygiene is hugely important, and your food will go inside the oven. Thus, it goes without saying that the oven should be clean.
2. Assemble the oven
The next step is assembling the oven. The cooker is made up of different components such as the low rack, high rack, extender ring, lid or base or hinge, the baking tray, the cake or rice cooker pan, the bread rack, tongs, glass oven bowl, skewers, replacement halogen bulb, and steamer tray.
All these parts have different functions, and together they ensure that your halogen cooker works effectively. Here are the steps you need to follow to make sure that you correctly assemble the appliance.
The halogen device needs to be on a surface that is flat, stable, and heat resistant. Therefore, put the cooker in such a place. While doing this, confirm that it is not touching the walls or other appliances because the oven will be hot at some point.
Although the halogen oven has a sturdy base, I discovered that some people lay a heatproof mat below the appliance to give it extra protection.
The bottom part of the oven bowl comes with an extender ring which you need to take off. Position the glass dish on that part.
The high or low food rack can then go on the upper part of the glass oven bowl. Cover that deep dish with a lid. Be careful when doing this to avoid damaging the lamp.
3. Preheat the oven
It is now time to pre-heat the oven. 10 minutes is enough time for this, and a temperature of 200°F is recommended. Set the timer, then turn on the oven.
After ten minutes, the timer will go off. You need to allow the oven to cool for approximately 10 minutes before opening the lid.
I found out that the oven might give off a slight odor when you initially use it. This is normal, and it should not scare you.
It happens because some substances that might have remained during manufacturing get burnt off. It is not dangerous, and your food is safe in the kitchen appliance.
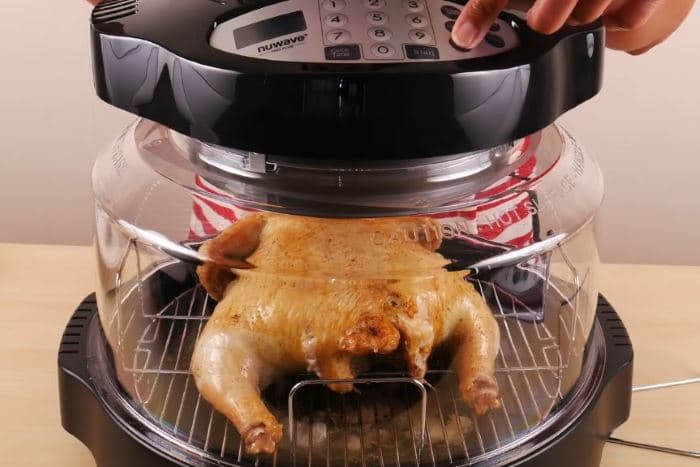
4. Put in the products
After preparing the halogen oven, you need to put the food inside it. You should understand that the food should not be placed directly in the glass bowl.
It goes inside a bowl, dish, or cooking tin, and then you place it on the high or low rack and finally, put it in the transparent glass bowl.
You must use a rack to enable hot air to circulate within the food. This will help it to cook evenly. You may need to turn some foods while cooking if you feel that one side may not be getting enough heat.
It is vital to know which meals go on the low and high rack to get great results. The low rack is perfect for foods that cook slowly because the rack is at a reasonable distance away from the heating component.
You can prepare a lot of different meals – steamed vegetables, fish, stews, and anything that requires baking, roasting, slow cooking, reheating, and steaming.
The higher rack is best suited for nourishments that need grilling, frying, toasting, and searing. You can prepare burgers, sausages, chips, and steak on this rack.
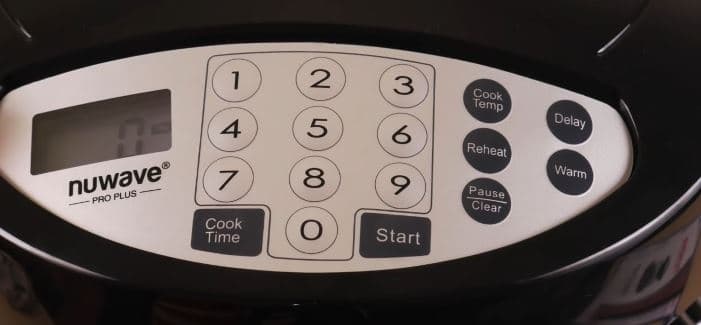
5. Set up the temperature and time and start cooking
Now that the food is in the oven, it is time to start cooking. Set the correct temperatures and timer. You’ll need to press the button labeled ‘Cook Time,’ set the time, and press the start button.
60 minutes or less is the recommended time, but this also varies from one food to another. For example, a sausage needs 10 minutes while potatoes can take between 15 to 40 minutes.
Cooking starts when you press the start button. You will see the remaining cooking time displayed on the panel. When your set cooking time expires, the oven will produce a beeping sound, and cooking will stop.
Use the pause/clear button once to pause or stop cooking before the timer rings and twice to stop.
6. Remove the food when the cooking is finished
You can get the food off the oven after cooking comes to an end. If you want to remove it immediately, make sure to use tongs because it will be hot.
I realize that some people put on oven gloves when removing food from the oven. You can also remove the meal later on.
7. Clean the oven
You must always clean the oven after you are done cooking. Make sure you unplug the halogen device from the main before you start cleaning.
You can wash the various components in the dishwasher apart from the power head, which can be damaged if placed in the dishwasher.
Carefully wipe the exterior of the dishwasher using a sponge or damp piece of cloth. Make sure to avoid using abrasive cleaners when cleaning plastic and metal surfaces.
Liquids should not get into the upper part of the appliance lid during cleaning because it could result in a short circuit and a fire. If you notice any liquid, then have a qualified electrician check it out before you use it.
You should also note that you should never fill the glass bowl with cold water when it is still hot because it will crack. First, give it time to completely cool before doing that.
Before you press the start button to allow the halogen appliance to self-clean, you should get rid of the food left, put in washing liquid in the glass bowl that is half-filled with water, close the lid, and press sterilize.
Frequently Asked Questions
I am compiling a list of questions I will answer.
Does the Nuwave oven use radiation?
No, Nuwave does not use radiation.
Can I use aluminum foil in the Nuwave oven?
Yes, you can use aluminum foil in the Nuwave oven.
What about using the Nuwave oven as a dehydrator?
Yes, you can use Nuwave as a food dehydrator. The manufacturer says you need the Dehydrator Kit with dehydration trays to do large batches. I have discovered that you can use the oven to dehydrate the food without purchasing any accessories.
How much power does a Nuwave oven use?
The output of the Nuwave oven is 1500 Watts.
Conclusion
Using a halogen oven is not something that requires a lot of mental work and is suited for busy professionals and students. You simply need to follow these instructions from the first step of ensuring that the oven is clean to the cooking and cleaning processes.
Using the cooker will be so much fun now that you are armed with the correct information about using a Nuwave infrared oven and its pros and cons.
